Configuring Alpine to work with GMail
After getting my Linux system updated and configured, I decided to install the Alpine mail client so that I could check my e-mail using a standalone client rather than having to use a web browser. While there are many text-based e-mail clients available (like mutt), I chose to use Alpine (developed by the University of Washington) since is an updated version of the classic Pine mail client and is offered under an Apache license. The primary benefit to using Alpine is that it is a light-weight, full-featured text-based mail client that is also easy to use and includes its own text editor (called Pico). The fact that it does not render HTML e-mail is an added bonus.
After reading through several websites on configuring Alpine, and several trial-and-error attempts, here is how I got Alpine to work with Gmail via IMAP. This document consists of the following sections:
- Part 1: Install and Configure Alpine to work with Gmail
- Part 2: Introduction to using Alpine as an E-mail client
Part 1: Installation & Configuration of Alpine
As always, before attempting any software installation or configuration, make sure you have backed up ALL your files and data (just in case anything goes wrong). Also, before attempting to install or configure Alpine, make sure you have thoroughly read and understood its [Alpine’s] supporting documentation (available online at the Alpine project website). In order to install and use Alpine, you should have a working knowledge of UNIX and be comfortable working in a command-line environment. If you are uncomfortable with the command-line, consider using a graphical e-mail client.
- First, make sure you have enabled IMAP access in Gmail (this is done through the ‘Forwarding and POP/IMAP’ option in Gmail’s settings)
- Install Alpine. If you use a package manager like Debian’s apt, you can issue the following command:
sudo apt-get install alpine
If you use Red Hat Linux (or one of its derivatives), you can install alpine using the yum package manager by issuing the following command (as a user with root-level privileges):
yum install alpine
If you use OS X, install the Fink package manager and edit your fink configuration file (/sw/etc/fink.conf) to include ‘stable/crypto’ in your list of trees. Then install re-alpine using the following command (re-alpine is an updated version of Alpine and is the only one available for OS X 10.8 (Mountain Lion):
fink install re-alpine - Launch Alpine (by entering ‘alpine’ into the command prompt) and access its setup options by typing ’s’ at the main menu:
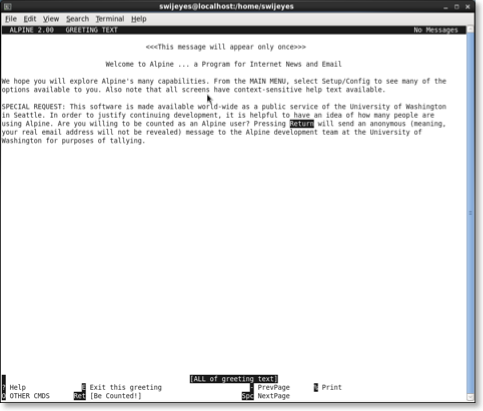
Figure 2: The welcome message in Alpine (only shown the first time the program is launched)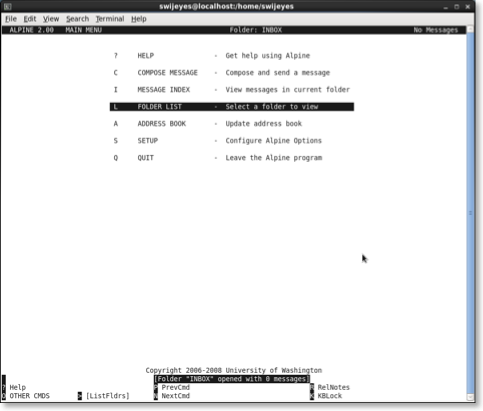
Figure 3: The main menu in Alpine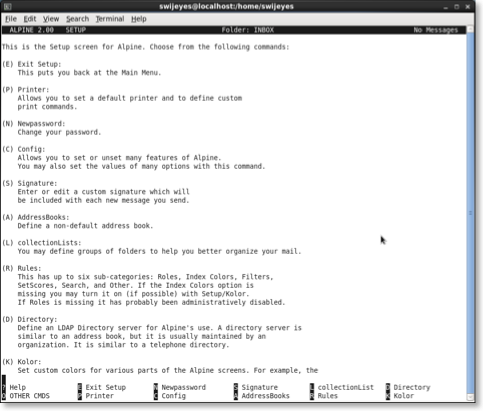
Figure 4: The setup options in Alpine - Once in the setup menu, select the ‘CollectionLists’ option by pressing ‘L’ and add new collection list by selecting ‘Add Cltn’.
- You can now give this new collection list a name (like ‘Gmail’ for example) and set the server to the following ([email protected] is your Gmail user name):
- imap.gmail.com/ssl/[email protected]
- Exit the collection list setup and save the changes you have made.
- In order to finish configuring Alpine, return to the main menu, go back into setup options and select ‘Config’ (press ‘C’). Use the following settings (once again, [email protected] is your Gmail user name):
- SMTP server: smtp.gmail.com/novalidate-cert/[email protected]/ssl
- Inbox Path: imap.gmail.com/novalidate-cert/ssl/[email protected] (Note: When prompted for an inbox folder, enter ‘INBOX’ (without the inverted commas))
Note: the 'novalidate-cert' option tells Alpine to skip the warning message asking you to validate google's SSL certificate (this is needed since Alpine doesn’t recognize Google’s SSL certificate). - Optional: You can set a user-specified domain in Alpine’s configuration that will be appended automatically to addresses that lack a domain name. For example, if you have set your user domain to ‘example.com’, simply entering a user name (like ‘user)’ in the To: field of an e-mail will result in ‘@example.com’ being appended to the username to yield a complete e-mail address ([email protected]). If you correspond frequently with other Gmail users, you can set Alpine’s user domain to ‘gmail.com’.
- Optional: If you don’t want to enter your password every time you open Alpine, simply create a file called ‘.pine-passfile’ in your home directory:
touch .pine-passfile
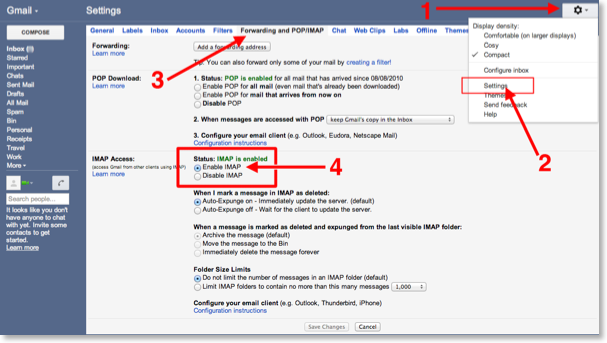
Figure 1: Enabling IMAP support in Gmail
If all went well, you should now have a fully functional copy of Alpine that is configured to synchronize with your Gmail account.
Part 2: Using Alpine: A Primer
- Starting Alpine. Launch alpine by entering ‘alpine’ into the command line
alpine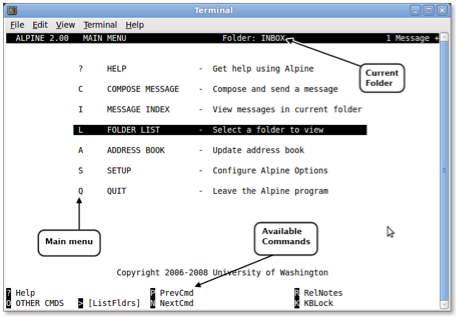
Once launched, you will see Alpine’s main menu together with two rows of available commands. The main menu can be navigated using your keyboard’s cursor keys or by typing the indicated letter (e.g. press ‘L’ to view a list of available folders). Similarly, you can run a command from the list of available commands by entering the indicated letter (e.g. press ‘>” to view a list of folders).
The title bar displays the version of Alpine, the current folder and the number of messages in the current folder. - Folder navigation. From the main menu, you can go to the current folder (by default, this is your inbox), but pressing ‘I’:

You can navigate your message list using the cursor keys. To read a message, select it and press return: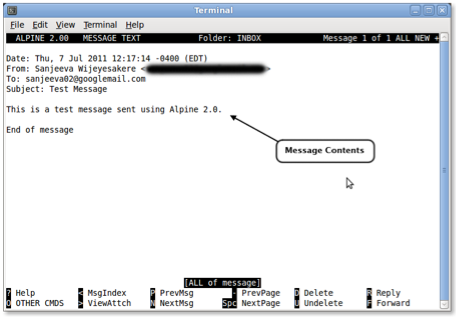
To get back to the message list, press ‘<‘. Alternatively, you can get back to the main menu by pressing ‘M’.
To navigate to a different folder, you can either select ‘L’ from the main menu in Alpine or select the ‘GoToFldr’ option by pressing control+g:
- Message composition. To compose a message, either select ‘Compose Message’ from the main menu or press ‘C’:
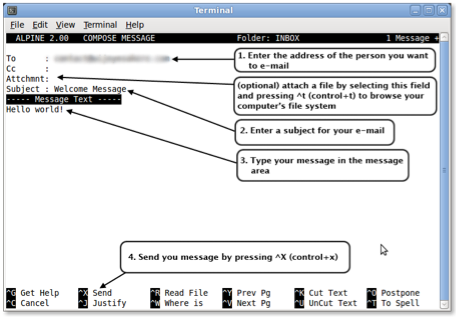
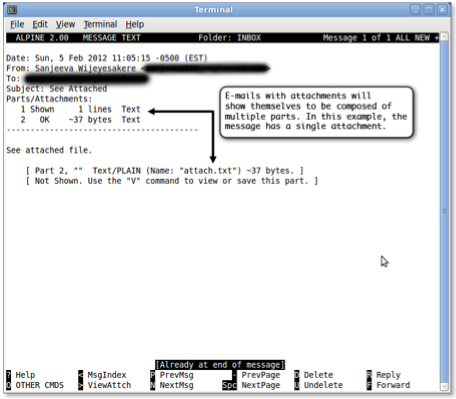
Once you have composed your e-mail, you can send it by pressing control+x. Alternatively, you can postpone your message to send at a later point in time by pressing control+o or you may choose to discard your e-mail (without sending it) by pressing (control+c). If you postpone a message, you will be prompted to continue composing it the next time you choose to compose a message. - Downloading attachments. Messages that have attachments will show multiple parts in the ‘Parts/Attachments’ section of the e-mail’s header:
You can view the various parts of the message by pressing ‘v’, and, after selecting the attachment, tell Alpine to save it by pressing ’s’: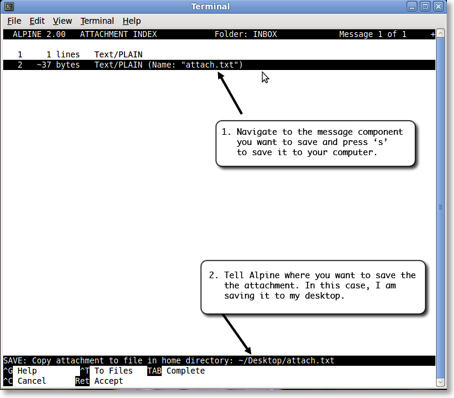
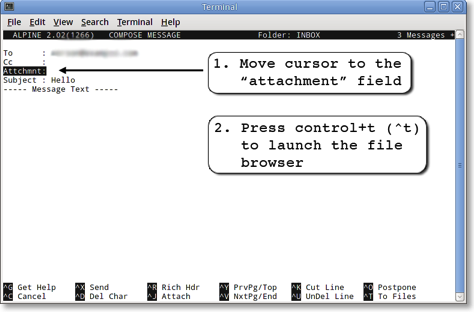
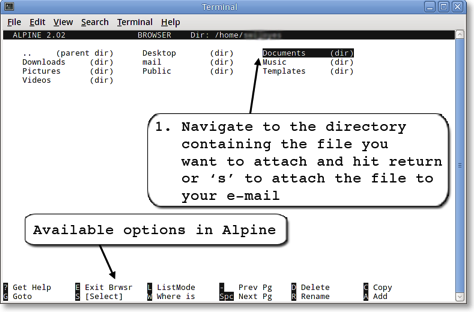
- Attaching a file to an e-mail . You can attach a file to a composed e-mail by moving the cursor to the “Attchmnt” field and pressing control-t (^t) to enter the file browser where your file can be located: